During the time I have been doing and teaching photography I have been asked on several occasions about taking photos of small items against a white background. This could be for things like jewellery or small items that you might be selling on eBay, or in my case it’s for images of my LEGO Minifigure collection for one of my other websites.
So here is the shot I ended up with:
As you can see, it’s a pretty basic photo and I’ll own up to the fact that it’s actually really easy to get this effect which is why I’m writing about it on my Photography Basics site.
Gear List
Here is what I used for this shot:
- Sony Alpha A700
- Tamron 28-75mm f2.8 Lens
- Manfrotto 190XPro B Tripod
- Manfrotto 322RC2 Head
- Sony HVL-F42AM Flash
- 3 Sheets of white A4 paper
- Gaffatape
- 1 Robot Minifigure
Ok, some of my gear isn’t what every beginner might have, but you don’t really need a tripod, you can hand hold the camera or rest it on a table or a bean bag. You don’t need an expensive flash gun, the on board flash will work almost as well with the method I used.
Lighting
The lighting setup for this is very simple, the technique is to use bounced light and reflected light and this is where the sheets of A4 paper come in. You only actually need 2 sheets of A4 paper, but the weight of the paper I used was quite thin so I just used two sheets to form a curve of paper to act as a background for the shot.
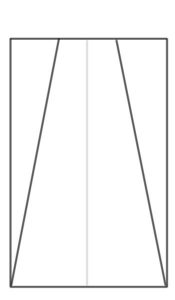
The other sheet of paper is used to attach to the flash. This high tech piece of equipment is very easy to make, just fold one A4 piece of paper along the dark lines and then softly fold (so as not to score the edge) along the lighter line along the centre, like this:

Then just attach it to your flash. If you are using just the camera’s pop up flash you might have to get a bit more creative with the gaffer tape, but the end effect should look similar to the photo above.
What this will do is create a softer pool of light around the subject from the flash which will help reduce any shadows and create an even lighting effect. Couple this with the reflected light from the curved paper and you will get the even white background with minimal shadows on the subject.
Camera Settings
When I am doing this type of photography where I want ultimate control over the image and lighting, I use the fully manual setting (M) to allow me to control both the aperture and shutter speed independently. I also use the manual settings on the flash so I can control the level of lighting.
Now, as we are using the manual settings, we aren’t going to get things right with the first shot. My approach is to set some ball park settings on the camera and the flash and then adjust one at a time to achieve the results I want. So lets take one setting at a time, first aperture. I know I need to get all of the LEGO minifigure in focus and as I am taking fairly close up photography I know that the depth of field is a lot less the closer you get to the subject. So, to get a decent depth of field, I started with f11. For a shutter speed, I set the camera up with 200th of a second. The flash I then set on half power. This is all guess work for me, but the settings I used gave me the flexibility to move them either way.
The first shot was a disaster, everything was way too bright and you could hardly see the minifigure in the shot. So what options do I have to darken the image. Well, my first thought was that as the image was way too bright, reducing the flash level was my first route so I turned the flash down to 1/8th power. Now we are getting somewhere, but things were still a bit bright, so now I decided to tweak the aperture. Remember that the aperture controls how much light reaches the sensor while the shutter is open. If the image is too bright, reduce the aperture size by making the F number larger. I ended up using F16 to get the final shot.
Summary
So, if you break this down into the techniques actually used, you using the basic principles of working in a studio just on a much smaller scale. You are controlling all the lighting yourself. You are using manual settings on the camera and adjusting the settings based on the fundamentals of photography, aperture and shutter speed (in this case, I didn’t adjust the ISO settings at all). Using the results of your test shots you can adjust one setting at a time and get closer to the result you want.
So now you have a mini studio, why not practise using it. The weather is pretty rubbish at the moment (or it is where I live) so you have no excuse not to. It can all be done on your coffee table in front of the TV. What could be better?


White photography backdrops can help boost your photo’s sharpness and attractiveness to your visitors. It also help enhance its beauty and color.
A great bit of info and proof that you don’t need to buy one of those kits on eBay but you can do it yourself. I love it when people use the ingenuity to get jobs done rather than just throwing money at something. I would say the results speak for themselves too.