In one of my previous posts from many moons ago, I explained what shutter speed was and the different effects it has on the image. So now here is a practical example of how you would control shutter speed to give you the results you want.
So just to recap, shutter speed is the length of time the shutter is open to allow light to hit the sensor, or if you are still old school, the film. This can be fractions of a second or many seconds depending on the result you want to get.
Landscape photography is probably one of the areas of photography where you see long exposures used most often. Any image where water features can lend itself quite well to using a long exposure. So that was my plan when I ventured out on Good Friday this Easter Weekend.
Before I decided on where to go, I did some research to find a location that would give me some moving water and some features to use in the image. I also had to check tides times and the time the sun set. Fortunately with the use of google maps and a handy iPhone app for tide and sun set times, I found the perfect place, Prestatyn Beach in North Wales. So it pays to do the research before leaving the house, it can save a lot of time, hassle and panic when you find you are in the wrong place at the wrong time and miss the shot you wanted.
So, for this type of photography there is some key equipment that will make your life easier.
First and most important is a tripod. If you are doing any sort of photography where the shutter speed needs to be slowed down, a tripod is pretty much mandatory. One that’s sturdy with a good solid head on it will do the job, but also bear in mind that you need to carry it too so there is always a compromise between weight and sturdiness. Carbon fibre tripods help, but they don’t help your bank balance so it’s up to you as to which one you get. Just remember, a tripod should last you years so saving up for a decent one is a good idea.
Ok, so next comes filters to put in front of the lens. For my shot I used an ND filter by Lee Filters. I knew I was going to be including the sun in my shots so an ND filter will help me reduce the amount of light further to let me get a longer shutter speed. Without an ND filter, shooting into the sun will still be bright, even at sunset so do bear this in mind. For my image I used a filter known as the Big Stopper. This is a 10x ND filter which massively reduces the light getting through to the sensor and would allow me to get the long shutter speeds I wanted.
Next is a camera that allows a feature called ‘Bulb’, which is a way to get very long shutter speeds and by long, I mean several minutes or more. My Fuji X-Pro1 has this function, it also has a screw thread in the shutter release button which will allow me to use a shutter release cable to help further reduce any vibrations while the shutter is open.
So now it’s time for me to own up to a classic photographers mistake. Not checking their gear before leaving the house. If I had checked properly I would have realised I’d left my shutter release cable at home. I swore quite a lot when I realised this but it was too late to go back and get it so I had to do without. Not an ideal situation. I won’t do it again, that’s for sure.
As I was shooting landscape images, I wanted a wide field of view to capture the vast beach and the sky too. I used an 18mm lens, which on my camera is equivalent to around a 27mm lens on a full frame camera.
As well as my camera gear, I took a warm top. Even though it was a nice day, I knew as the sun went down it would get a bit cold. I actually should have taken a coat too as it got very cold, but I’m glad I at least had a hoodie with me.
Oh, and I took a banana too. Very important to eat while you are out.
So, all set and I arrived at Prestatyn Beach with plenty of time to scout out a good location and do some test images first. I had two hours before the sun set so it was time to try things out and make sure everything went right when it was important.
My first few shots where not meant to be anything other than practice shots with the ND filter and long exposures, so they weren’t shots I was going to keep. It is a good feeling though when you see the first few images and realise that you were going to get the type of image you wanted. So I’d now got the fundamentals right, time to get some proper images.
As I had done my research, I knew there were some rocky areas and large areas of sand with some structures used to mark the end of the beach groynes. Not too much that would clutter up the image, but enough to get some interesting compositions.
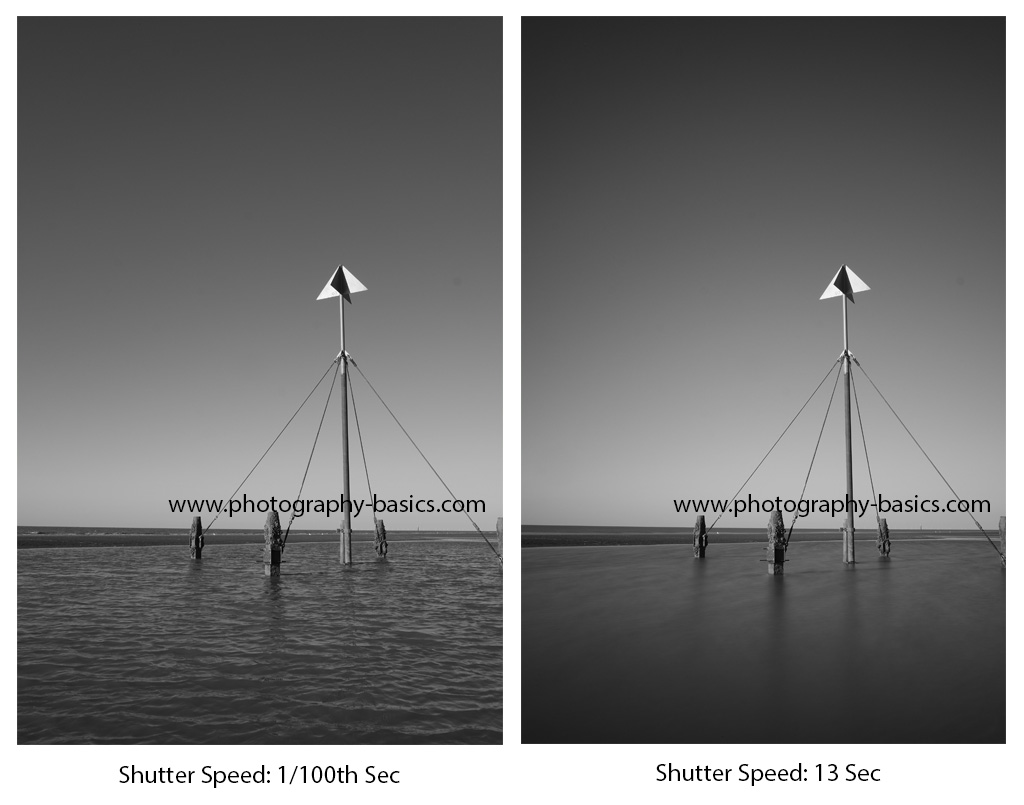
 So first off, we have a simple shot across a small body of water to one of these groyne markers. The water was rippling in the wind but I wanted to get a nice smooth look to the water so for this I ended up using a shutter speed of 14 seconds with an aperture of f16 to detail all the way through the image. Fortunately that’s a shutter speed my camera can handle without me having to use the bulb setting (more on that in a bit) so by using the 2 second timer I was able to set up the shot, press the shutter release and then move away from the camera for the 14 seconds to avoid any vibrations from me holding the camera. You can see the nice smooth effect on the water and the amount of detail from the foreground water to the marker structure and beyond. Just what I was after. I also did a black and white conversion in Adobe Lightroom too.
You can see from this next shot what it would have looked like if I hadn’t used the ND filter as it was still very bright so even at f16, the shutter speed was too quick to blur the ripples into a nice smooth effect.
I think I’m off to a pretty good start, so I continued to try and few locations out, all the time I was keeping an eye on the time and the sun to make sure I still had plenty of time to get set up. While wandering around looking for locations, I took advantages of other image opportunities and found a few details and compositions that I thought were quite pleasing.


So while these weren’t the shots I was initially going for, for the short time they took to set up, I think the results were worth it.
I still had some time before the sun was going to be in the position I wanted, so it was time to try out the bulb shutter speed setting. This meant I had to do some maths to work out the right shutter speed. Uh oh, Maths!!! Well, fortunately for me, Lee Filters provide a handy guide to help me work out the correct time. Basically you take the filter off, take a shot, look at what shutter speed you used and then you can look up on a chart the correct time when you put the filter back on. As I mentioned before, I had forgotten a key accessory for this type of shot, the shutter release cable, so without that I had to keep the shutter release pressed down for the right amount of time using my fingers and potentially introduce some blur with small movements of the camera even on the tripod. Not an ideal situation, and fortunately for me in this case, it wouldn’t be a problem in the final image.
So back to the main shot I wanted. I found the reflections and patterns in the sand quite a nice detail and with some small clouds starting to form as the sun went down, the sun was turning a nice orange colour. Everything was coming together. Looks like a perfect time for my camera battery to start to run out! Unbelievable how it always happens at the wrong moment, but by taking lots of long exposure shots with the temperature dropping, it doesn’t do battery life much good. Fortunately in this case I was prepared as I had a feeling this would happen, and I had a spare battery with me that I had charged up before I left. So a quick battery swap and I was all set. I had my composition, I had my timings worked out, the sun was just in the right place so it was time to get the shot.
As I was pointing into the sun, the shutter speed was short enough to manage without the need for the shutter release cable, so I was quite relieved about that. At f16, I was using a 10 second exposure at ISO 200 with the ND filter on. For my first decent attempt at landscape photography with long exposures, I was quite pleased with the result.

So, if you want to go out and try it for yourselves, remember to do some planning up front to find a good location. Prepare your gear, charge your batteries, remember all the important equipment, suitable clothing and a banana. You will need some specific equipment for this type of shot so either borrow it if you haven’t got it or save up your pennies and get some decent equipment, especially the tripod, it will last longer than your camera so make sure you get a good one.
If you do manage to get some good long exposure shots, please share them with us. It’s something I’m certainly going to try again.
ur photos are good ,try to capture waterfalls wit long exposure it’ll be amazing
Thanks Emmanuel, waterfalls are something I haven’t had a lot of opportunities to take pictures of although it’s something I’d love to do more of. Have you got any waterfall images that you can share?
Hello Gary,
Thank you for the exception article.
I struggle with the housing for the ND filters. I have read a lot of articles but none explain the idea housing for ND filters. Could you please share your equipment and technique on how to use them ?
Also I struggle with maintaining focus when installing the filters. I do an auto focus, switch to manual focus so camera does not automatically adjust when doing the actual click.
However after doing the autofocus the lens turns when trying to install the ND filter and once the filter is installed it is too dark for the camera to autofocus.
So now I am back to unfocussed image which I cannot focus unless i take the filter off which bring me back full circle on the issue.
Thank you.
Ashutosh
Hi, thanks for getting in touch. I can see how tricky this is for you and yes, I have had the same problem. My advice would be to first make sure you have a good tripod to keep everything still. For focussing, it really depends on what distance to your subject you are working with. The closer the subject, the easier it is to knock it out of focus.
My equipment for the photos in the article were the Lee Filters Seven5 system. These are square filters that slide into the holder, rather than screw on. So the way I worked was to remove the filter, but leave the filter holder attached to the lens, set up the shot, then very carefully slide the filter into the holder. You still have to be careful but because you aren’t twisting the lens, you shouldn’t alter the focus.
Another trick you can try is to get a thick elastic band and put that round your lens to try and make it harder to move the focus ring. Obviously this is for manual focus as you don’t want to restrict the autofocus motors. This may help keep the focus setting correct while you add your filter to the front.
Good luck and feel free to share your photos with us.